How to Set Up Angular and Webpack in Visual Studio With ASP.NET Core
How to Set Up Angular and Webpack in Visual Studio With ASP.NET Core
With this blog post I want to show an example of how to set up Angular and Webpack in Visual Studio with ASP.NET Core ready for dev and production builds.
See also my latest article Angular Ahead Of Time (AoT) compilation, lazy loading and treeshaking with webpack
If you read this until the end you will have a picture how to enable webpack and webpack-dev-server with npm and how to use webpack to bundle your angular application and inject files into index.html for your web application.
I had this topic already with my colleague DamienBod here and a StarterTemplate here (which is using system.js as bootstrapper for your application), but this post is more to show how we get there and which steps you should take to get things going. For Damien and me this was a bit confusing in the beginning so this is the guide how we started actually. I hope you like reading it as much as I liked writing it.
Find the code here:
https://github.com/FabianGosebrink/ASPNETCore-Angular-Webpack-StarterTemplate
The new project
Select “File” –> “New Project”

And create a new project. In this case we name it “Angular2WebpackStarter”. After creating you can take the empty template like this:

Make sure you have installed the latest typescript nuget package because we will need it later to work with angular and visual studio 2017.
Add the necessary files and folders
The next step is to add the files and folders which are needed to keep your application structured and organized.
Add a new folder in your solution and call it “angularApp”. This where all the client related dependencies are stored and being “compiled” and transferred to the wwwroot folder later on.
Next, add these files to your project and fill it with this data:
package.json Your npm file related to your project. It keeps als dependencies and everything for your client.
{
  "name": "aspnetcore-angular-webpack-starter",
  "version": "0.0.0",
  "license": "MIT",
  "description": "a small starter package for angular and asp.net core",
  "scripts": {
    "ngc": "ngc -p ./tsconfig-aot.json",
    "start": "concurrently \"webpack-dev-server --env=dev --hot --inline --port 8080 --open\" \"dotnet run\" ",
    "build:dev": "webpack --env=dev --progress --profile --colors",
    "build:dist": "webpack --env=prod --progress --profile --colors",
    "lint": "tslint ./angularApp/**/*.ts -t verbose",
    "tsc": "tsc",
    "tsc:w": "tsc -w"
  },
  "keywords": [],
  "author": "Fabian Gosebrink",
  "dependencies": {
    "@angular/animations": "^4.3.5",
    "@angular/common": "~4.3.5",
    "@angular/compiler": "~4.3.5",
    "@angular/compiler-cli": "~4.3.5",
    "@angular/core": "~4.3.5",
    "@angular/forms": "~4.3.5",
    "@angular/http": "~4.3.5",
    "@angular/platform-browser": "~4.3.5",
    "@angular/platform-browser-dynamic": "~4.3.5",
    "@angular/platform-server": "~4.3.5",
    "@angular/router": "~4.3.5",
    "@angular/upgrade": "~4.3.5",
    "angular-in-memory-web-api": "0.3.2",
    "angular2-toaster": "^4.0.1",
    "bootstrap": "^3.3.7",
    "core-js": "2.5.0",
    "ie-shim": "~0.1.0",
    "jquery": "^3.2.1",
    "ng2-slim-loading-bar": "^4.0.0",
    "reflect-metadata": "0.1.10",
    "rxjs": "5.4.3",
    "zone.js": "0.8.16"
  },
  "devDependencies": {
    "@ngtools/webpack": "^1.6.1",
    "@types/jasmine": "^2.5.53",
    "@types/node": "8.0.24",
    "canonical-path": "0.0.2",
    "codelyzer": "^3.1.2",
    "concurrently": "^3.5.0",
    "http-server": "^0.10.0",
    "lite-server": "^2.3.0",
    "lodash": "^4.17.4",
    "node-sass": "^4.5.3",
    "protractor": "~5.1.2",
    "rimraf": "^2.6.1",
    "ts-helpers": "^1.1.2",
    "tslint": "^5.6.0",
    "tslint-loader": "^3.5.3",
    "typescript": "~2.4.2"
  },
  "-vs-binding": {
    "BeforeBuild": [
      "build:dev"
    ]
  }
}
tsconfig.json
Is configuring your tsc compiler. Whenever your run the “tsc” command from the commandline it will be taken as configuration for the typescript-compiler.
{
  "compilerOptions": {
    "target": "es5",
    "module": "es2015",
    "moduleResolution": "node",
    "sourceMap": true,
    "emitDecoratorMetadata": true,
    "experimentalDecorators": true,
    "removeComments": true,
    "noImplicitAny": true,
    "skipLibCheck": true,
    "lib": [
      "es2015",
      "dom"
    ],
    "typeRoots": [
      "./node_modules/@types/"
    ]
  },
  "exclude": [
    "node_modules",
    "angularApp/app/main-aot.ts"
  ],
  "awesomeTypescriptLoaderOptions": {
    "useWebpackText": true
  },
  "compileOnSave": false,
  "buildOnSave": false
}
Fill the angularApp-folder
Next we are going to fill the angularApp folder. Here we are going to be lazy. We are taking the quickstart repo from angular.io and copy the files we need form there. For the sake of simplicity we will only take the app.module to get things going. To be structured its best you create an app folder inside to place your code there.
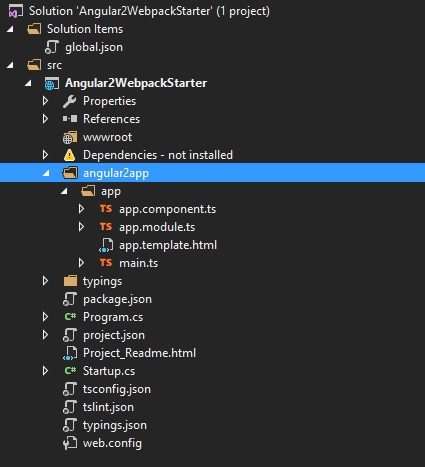
But to start we need an index.html. And for webpack to be prepared we need an entrypoint for the polyfills and the vendor files we need for our app. Lets add these files.
index.html
<!DOCTYPE html>
<html>

<head>
    <base href="/" />
    <title>ASP.NET Core Angular Webpack Demo</title>
</head>

<body>
    <app-sample>Loading...</app-sample>
</body>

</html>
Note that we include nothing here yet. This is on purpose. Read further… :)
I reduced the vendor.ts and polyfills.ts to store only the things we need
polyfills.ts
import 'core-js/es6/reflect';
import 'core-js/es7/reflect';
import 'zone.js/dist/zone';
vendor.ts
import 'jquery/dist/jquery';
import 'bootstrap/dist/js/bootstrap';
import 'bootstrap/dist/css/bootstrap.css';

import 'angular2-toaster/toaster.css';
import 'angular2-toaster/angular2-toaster';

import 'ng2-slim-loading-bar';
import 'ng2-slim-loading-bar/style.css';
Why did we all this and if the wwwroot-folder is the one to be served to the client…why are we doing all this?
This is where webpack comes into play. We will configure webpack now to build our application into the wwwroot folder. Let’s do this…
Lets add a webpack.config.js file to the root of the project. (Make sure you have the WebPack Task Runner Extension installed) .
So…you added the file: Paste the following content:
const ExtractTextPlugin = require('extract-text-webpack-plugin');
const webpack = require('webpack');
const HtmlWebpackPlugin = require('html-webpack-plugin');
const CleanWebpackPlugin = require('clean-webpack-plugin');
const path = require('path');

module.exports = {
  entry: {
    app: './angularApp/app/main.ts',
  },
  devtool: 'cheap-module-eval-source-map',
  performance: {
    hints: false,
  },
  resolve: {
    extensions: ['.ts', '.js', '.json'],
  },
  output: {
    path: path.join(__dirname, 'wwwroot'),
    filename: 'js/[name].bundle.js',
  },

  module: {
    rules: [
      {
        test: /\.ts$/,
        use: [
          'awesome-typescript-loader',
          'angular-router-loader',
          'angular2-template-loader',
          'source-map-loader',
          'tslint-loader',
        ],
      },
      {
        test: /\.html$/,
        use: 'html-loader',
      },
      {
        test: /\.(png|jpg|gif|ico|woff|woff2|ttf|svg|eot)$/,
        use: 'file-loader?name=assets/[name].[ext]',
      },
      {
        test: /\.css$/,
        use: ExtractTextPlugin.extract({
          fallback: 'style-loader',
          use: 'css-loader',
        }),
      },
    ],
  },
  plugins: [
    new ExtractTextPlugin('css/[name].bundle.css'),
    new webpack.optimize.ModuleConcatenationPlugin(),
    new webpack.optimize.CommonsChunkPlugin({
      name: ['app', 'vendor', 'polyfills'],
    }),
    new CleanWebpackPlugin([
      './wwwroot/js/',
      './wwwroot/css/',
      './wwwroot/assets/',
      './wwwroot/index.html',
    ]),
    new webpack.ContextReplacementPlugin(
      /angular(\\|\/)core(\\|\/)@angular/,
      path.resolve(__dirname, '../src')
    ),
    new webpack.ProvidePlugin({
      jQuery: 'jquery',
      $: 'jquery',
      jquery: 'jquery',
    }),
  ],
  devServer: {
    historyApiFallback: true,
    stats: 'minimal',
  },
};
This file is no magic, don’t be scared:
First we require everything we need to use to kick off webpack. Then we will export our complete configuration. Our entrypoints are pointing to the files we created (remember?) and of course our entrypoint of our application.
The “resolve”-array tells webpack to look for those file endings. The “output” is what we all were looking for. Here we tell webpack “Hey, what no matter what you are doing and how you are doing it, put it in the ./wwwroot-Folder and please be gentle and name the files like I will tell you later on ([name]) and please put a hash on it at the end, but only 8 digits ([hash:8])”. This is it.
Rules and Loaders are telling webpack how to handle such file endings. So: If you encounter such a file, so this and that. The plugins are telling webpack how to behave generally, to point which files out etc. And this is alle the magic.
package.json
Add the webpack-things we need to the “DevDependencies”-section in the package.json:
  "devDependencies": {
    "@ngtools/webpack": "^1.6.1",
    "@types/jasmine": "^2.5.53",
    "@types/node": "8.0.24",
    "angular-router-loader": "^0.6.0",
    "angular2-template-loader": "^0.6.2",
    "awesome-typescript-loader": "^3.2.3",
    "canonical-path": "0.0.2",
    "clean-webpack-plugin": "^0.1.16",
    "codelyzer": "^3.1.2",
    "concurrently": "^3.5.0",
    "copy-webpack-plugin": "^4.0.1",
    "css-loader": "^0.28.5",
    "extract-text-webpack-plugin": "3.0.0",
    "file-loader": "^0.11.2",
    "html-loader": "^0.5.1",
    "html-webpack-plugin": "^2.30.1",
    "http-server": "^0.10.0",
    "json-loader": "^0.5.7",
    "lite-server": "^2.3.0",
    "lodash": "^4.17.4",
    "node-sass": "^4.5.3",
    "protractor": "~5.1.2",
    "raw-loader": "^0.5.1",
    "rimraf": "^2.6.1",
    "sass-loader": "^6.0.6",
    "source-map-loader": "^0.2.1",
    "style-loader": "^0.18.2",
    "ts-helpers": "^1.1.2",
    "tslint": "^5.6.0",
    "tslint-loader": "^3.5.3",
    "typescript": "~2.4.2",
    "url-loader": "^0.5.9",
    "webpack": "^3.5.5",
    "webpack-dev-server": "^2.7.1"
  },
Run npm install or let VS do this for you.
Now that you’ve done this open up the Task Runner Explorer in Visual Studio and let the “Run – Development” go:
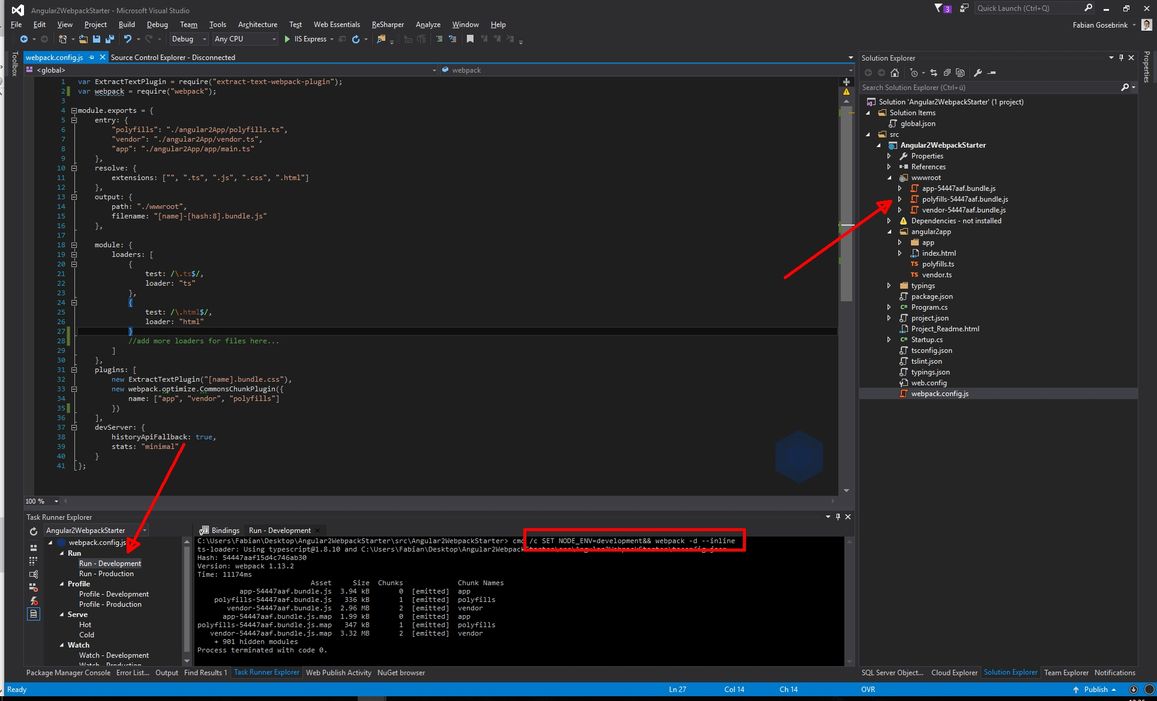
Et voila: our wwwroot-folder got filled with our entire app (or with what we have got so far). But there is one thing missing: The index.html!
Lets tell webpack to take our index.html we already have got and inject the sources into it and copy it too. To do this extend the “plugins”-section like this:
 plugins: [
        new ExtractTextPlugin('css/[name].bundle.css'),
        new webpack.optimize.CommonsChunkPlugin({
            name: ['app', 'vendor', 'polyfills']
        }),
        new CleanWebpackPlugin(
            [
                './wwwroot/js/',
                './wwwroot/css/',
                './wwwroot/assets/',
                './wwwroot/index.html'
            ]
        ),
        // inject in index.html
        new HtmlWebpackPlugin({
            template: './angularApp/index.html',
            inject: 'body',
            filename: 'index.html'
        }),
    ],
and add the
var HtmlWebpackPlugin = require("html-webpack-plugin");
at the top of the page. We need to include what we want to use ;)
let it run again:
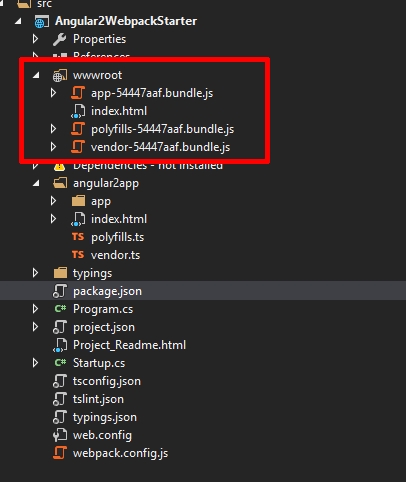
Lets take a look into this index.html:
<!DOCTYPE html>
<html>
  <head>
    <base href="/" />
    <title>ASP.NET Core Angular Webpack Demo</title>
    <link href="css/app.bundle.css" rel="stylesheet" />
  </head>

  <body>
    <my-app>Loading...</my-app>
    <script type="text/javascript" src="js/polyfills.bundle.js"></script>
    <script type="text/javascript" src="js/app.bundle.js"></script>
  </body>
</html>
our files got injected!
Before we actually see our application we have to modify the Startup.cs to behave like we want it to:
public class Startup
{
    public Startup(IConfiguration configuration)
    {
        Configuration = configuration;
    }

    public IConfiguration Configuration { get; }

    // This method gets called by the runtime. Use this method to add services to the container.
    // For more information on how to configure your application, visit http://go.microsoft.com/fwlink/?LinkID=398940
    public void ConfigureServices(IServiceCollection services)
    {
        services.AddOptions();
        services.AddCors(options =>
        {
            options.AddPolicy("AllowAllOrigins",
                builder =>
                {
                    builder
                        .AllowAnyOrigin()
                        .AllowAnyHeader()
                        .AllowAnyMethod();
                });
        });

        // Add framework services.
        services.AddMvc();
    }


    // This method gets called by the runtime. Use this method to configure the HTTP request pipeline.
    public void Configure(IApplicationBuilder app, IHostingEnvironment env, ILoggerFactory loggerFactory)
    {
        loggerFactory.AddConsole(Configuration.GetSection("Logging"));
        loggerFactory.AddDebug();

        if (env.IsDevelopment())
        {
            app.UseDeveloperExceptionPage();
        }
        else
        {
            app.UseExceptionHandler(errorApp =>
            {
                errorApp.Run(async context =>
                {
                    context.Response.StatusCode = 500;
                    context.Response.ContentType = "text/plain";
                    var errorFeature = context.Features.Get<IExceptionHandlerFeature>();
                    if (errorFeature != null)
                    {
                        var logger = loggerFactory.CreateLogger("Global exception logger");
                        logger.LogError(500, errorFeature.Error, errorFeature.Error.Message);
                    }

                    await context.Response.WriteAsync("There was an error");
                });
            });
        }

        app.UseDefaultFiles();
        app.UseStaticFiles();

        app.UseCors("AllowAllOrigins");

        app.UseMvc();
    }
}
Now we have an index.html and we can press the play-button in Visual Studio:
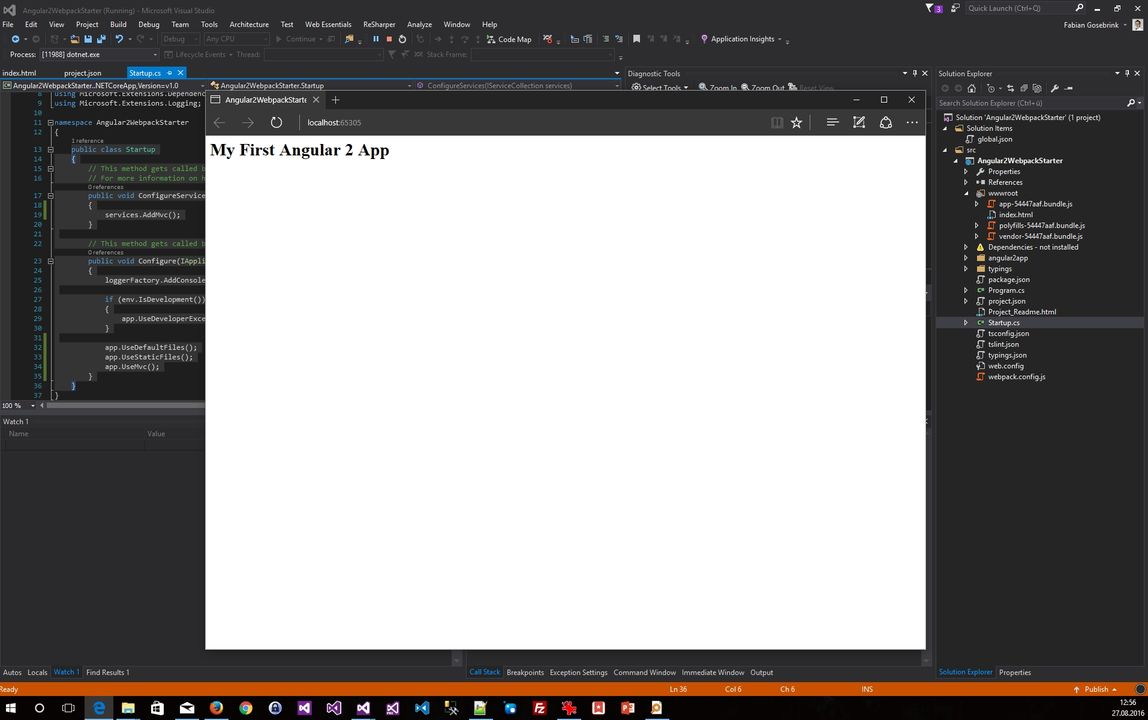
So it is working!!
Great so far.
Adding webpack dev server:
Wouldn’t it be nice to get the files refreshed as soon as I start working on them with this webpack construction? Well we already added the webpack dev-server in the package.json as dependency and in the web.config we already configured it in a basic way. So now lets use it:
You can now change the “npm start” command but we will make another one like “startWebpackDevServer”. So add the following line into the scripts section of package.json:
"startWebpackDevServer": "webpack-dev-server --inline --progress --port 8080",
Now open a commandline to the level of your package.json and type “npm run startWebpackDevServer”:
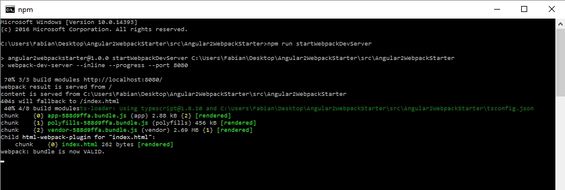
Let it open and browse to “localhost:8080”
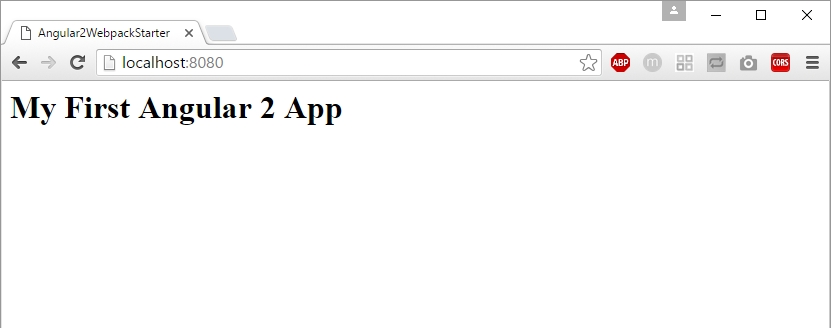
There your app appears!
So lets take a look how this behaves if we change a file…

Okay great.
Now lets go ahead and build this thing up to use development and production builds, which is our last step:
Development and Production builds
Lets take a closer look to what we did when we first ran our webpack:

There webpack is setting the variable “env” to “development”. Lets use that!!!
rename the “webpack.config.js” to “webpack.dev.js”. Create a new webpack.config.js.
All we need to do now is creating a switch which says “if you are development, use a (new) file (we will create) which takes the dev-thing, otherwise take the production ones”
module.exports = function (env) {
  console.log(env);
  return require(`./webpack.${env}.js`);
};
So THIS is our new entrypoint for webpack, the new webpack.config.json!!
Create a file which is called “webpack.prod.js” which will be our production file in the future. You should now have something like this:
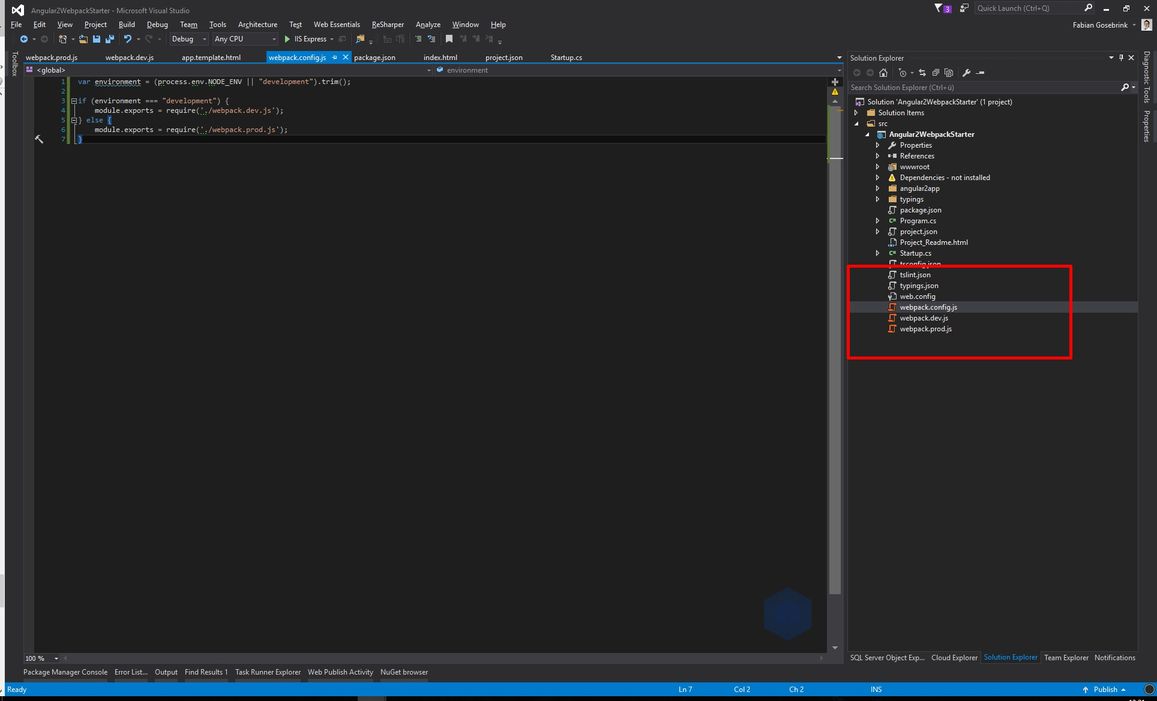
To test this put a console.log in the production file like:
console.log("----> Production");
and let it run:

So now lets pimp the production a bit. Its mostly the same we have so far for dev, but we need a little more plugins. Maybe the one to uglify the js UglifyJsPlugin and to delete the files in the wwwroot first “Clean for webpack”.
Copy the whole content from the webpack.dev.json to the prod.json and add the uglifyjs-plugin like this:
// AoT plugin.
new ngToolsWebpack.AotPlugin({
  tsConfigPath: './tsconfig-aot.json',
}),
  new ExtractTextPlugin('css/[name]-[hash:6].bundle.css'),
  new webpack.optimize.ModuleConcatenationPlugin(),
  new webpack.optimize.CommonsChunkPlugin({
    name: ['app', 'vendor', 'polyfills'],
  }),
  // inject in index.html
  new HtmlWebpackPlugin({
    template: './angularApp/index.html',
    inject: 'body',
    filename: 'index.html',
  }),
  new webpack.optimize.UglifyJsPlugin({
    compress: {
      warnings: false,
    },
    output: {
      comments: false,
    },
    sourceMap: true,
  }),
  new webpack.ProvidePlugin({
    jQuery: 'jquery',
    $: 'jquery',
    jquery: 'jquery',
  });
If you now let the prod-task run the files will be treated as ever but they are uglified as well.
To clean the wwwroot-folder first we need to install another plugin “Clean for webpack” and use it:
npm install clean-webpack-plugin --save-dev
and in both webpack-files
var CleanWebpackPlugin = require('clean-webpack-plugin');
 //....

plugins: [
    new ExtractTextPlugin("[name].bundle.css"),
    new webpack.optimize.CommonsChunkPlugin({
        name: ["app", "vendor", "polyfills"]
    }),

    new webpack.optimize.UglifyJsPlugin({
        compress: {
            warnings: false
        }
    }),
    new CleanWebpackPlugin(
        [
            './wwwroot/js/',
            './wwwroot/css/',
            './wwwroot/assets/',
            './wwwroot/index.html'
        ]
    ),
    // inject in index.html
    new HtmlWebpackPlugin({
        template: './angularApp/index.html',
        inject: 'body',
        filename: 'index.html'
    }),
],
Now our folder gets cleaned. You can add this into dev, too.
This is it. This is how you can treat Angular with webpack in Visual Studio with an ASPNET Core application. I hope you liked and enjoyed reading.
HTH
Fabian


