Token Authentication With Claims and ASP.NET WebAPI
In this post I would like to show you the most example about Token Authentication with Claims and ASP.NET WebAPI.
The sense behind this is:
- We ask the Server for a token
- We receive the token, store it client side and…
- …send it in the header on every request
The “problem” is that we do want to use all build in things Asp.Net WebAPI provides us. Microsoft serves us everything we need. So lets do this :)
First of all we configure our WebAPI to create a “controller” which is taking our requests. Here is the first unusual thing: The controller we create is kind of a virtual controller. We only provide it as a string.
OAuthOptions = new OAuthAuthorizationServerOptions
    {
        TokenEndpointPath = new PathString("/Token"),
        Provider = new ApplicationOAuthProvider(),
        AuthorizeEndpointPath = new PathString("/api/Account/ExternalLogin"),
        AccessTokenExpireTimeSpan = TimeSpan.FromDays(14),
        //ONLY FOR DEVELOPING: ALLOW INSECURE HTTP!
        AllowInsecureHttp = true
    };

// Enable the application to use bearer tokens to authenticate users
app.UseOAuthBearerTokens(OAuthOptions);
The “TokenEndpointPath” can be treated like a controller without really having one in your project. You will not find such a class there, so stop looking ;-) Other Properties speak for themselves. Well, now we have to take a look at the ApplicationOAuthProvider, we mentioned in the code, because this is a class which consumes the token request and gives us the token in the end.
Lets have a look at this.
public class ApplicationOAuthProvider : OAuthAuthorizationServerProvider
{
    public override async Task ValidateClientAuthentication(OAuthValidateClientAuthenticationContext context)
    {
        context.Validated();
    }

    public override async Task GrantResourceOwnerCredentials(OAuthGrantResourceOwnerCredentialsContext context)
    {
        context.OwinContext.Response.Headers.Add("Access-Control-Allow-Origin", new[] { "*" });

        if(context.UserName != context.Password)
        {
            context.SetError("invalid_grant", "The user name or password is incorrect.");
            return;
        }

        var identity = new ClaimsIdentity(context.Options.AuthenticationType);
        identity.AddClaim(new Claim("sub", context.UserName));
        identity.AddClaim(new Claim(ClaimTypes.Role, "user"));

        context.Validated(identity);

    }
}
The first line is a CORS-Line. You can get information about CORS looking here or here.
ATTENTION: I am only comparing username and password here for equality. Normally you yould take your own User-Repository or the Asp.Net-Identity thing.
If everything is alright we can create a new identity and add claims to it.
Thats it! For server side.
But how to consume it?
So we have created the endpoint…lets request it with a POST-Request. (I am using Postman here)
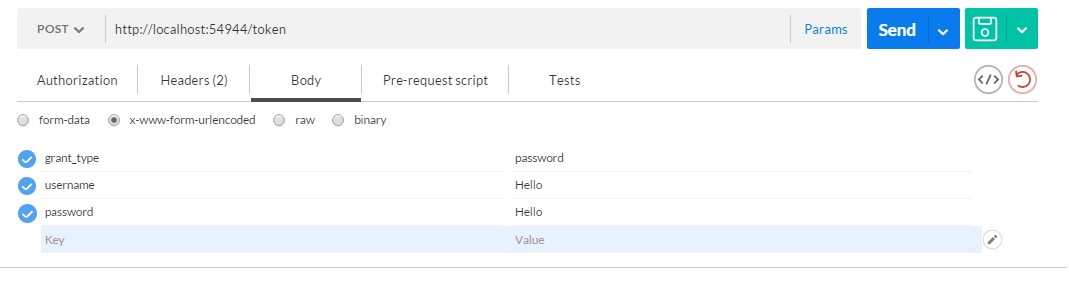
So send a post request to the token endpoint we created. Take a look at the “x-www-form-urlencoded” which is very important! Also see the “grant_type” which is set to “password”. Without this you will not reach the token endpoint. username and password are equal due to the fact we check it for equality in your OAuthProvider we introduced before.
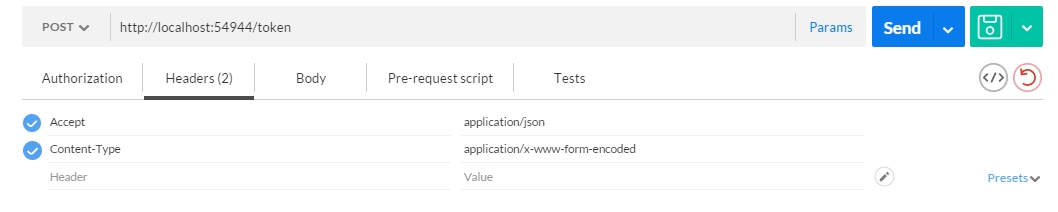 Also check that in the Headers-Section we set the content-type to “application/x-www-form-encoded”. Firing this request reaches the endpoint and is giving us a valid token:
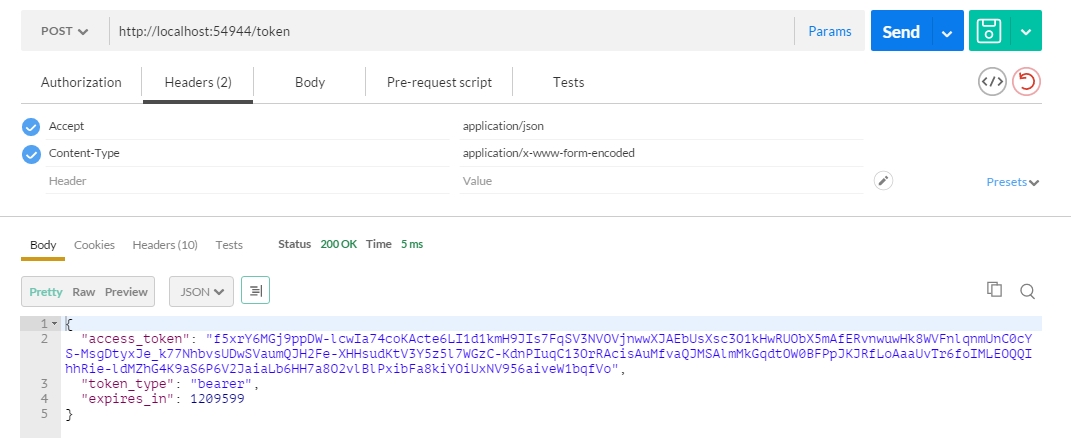
There you go. if we now copy this token and send it to a controller we tagged with the [authorize]-Attribute like this:
[Authorize]
public class ValuesController : ApiController
{
    // GET api/<controller>
    public IHttpActionResult Get()
    {
        ClaimsIdentity claimsIdentity = User.Identity as ClaimsIdentity;

        var claims = claimsIdentity.Claims.Select(x => new { type = x.Type, value = x.Value });

        return Ok(claims);
    }
}
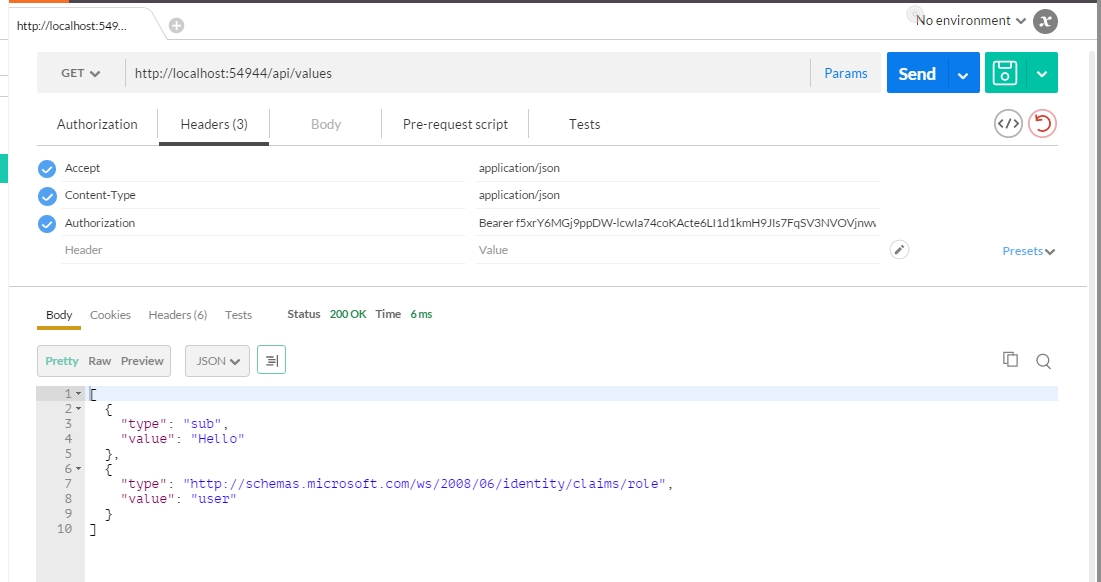
Note that we added the “Authorization”.Header with the “Bearer” and the token we received. We can send it and receive the protected resource.
Thats it :)
You can also check the roles you added in the claims by mentioning the roles in your Autorize-Attribute:
[Authorize(Roles = "user")]
public class ValuesController : ApiController
{
    // GET api/<controller>
    public IHttpActionResult Get()
    {
        ClaimsIdentity claimsIdentity = User.Identity as ClaimsIdentity;

        var claims = claimsIdentity.Claims.Select(x => new { type = x.Type, value = x.Value });

        return Ok(claims);
    }
}
The roles are added via claims in your OAuthProvider.
Hope this helps anybody.
Happy coding :)
Fabian