How to Make First Steps of Databinding in WPF
In this blog post I want to show you how to make first steps of Databinding in WPF.
I often hear or see that people try to start with WPF but they do not start mit MVVM. Because databinding is frightening them. But why? Databinding is one of the biggest advantages you can have to decouple your logic from your view.
With this post I want to give you a short introduction about databinding and how to get set up.
First things first: Why MVVM?
In the last time the MV*-Pattern was really getting pushed and was established because it gives you an easy possibility to divide your view form the logic which works underneath. In the web for example AngularJS gives you a lightweight MVVM-Pattern, ASP.NET works with the MVC-Pattern, wich also brings a separation between UI and Logic.
Advantages are:
-
Changing the UI without changing the logic: The UI changes more often than the logic. What if green is more “stylish” than the good old “blue”? It has to be changed, but all the things you show stay the same. Only because something looks different you are not showing different information.
-
Testability of the logic: Because logic gets more modular it can be well tested. You do not need to know about your view or how it looks like. The only thing your tests are interested in are the output-information.
-
Better overview: You can not only seperate the UI and the logic, you can also see it in the code. you have no UI-Code in your logic and no logic-code in your UI.
-
Different Teams: Also in SCRUM or whatever you use you can easily divide the work into several parts. UI Designers can only focus on their work, while programmers code (and test) the work completetly different. The touching points are only made because of the DataBinding.
Theoretically: What are we doing?
In Wpf and C# the UI-files are described as _.xaml-files. The viewmodels are normal classes which are _.cs-files. You can connect them via the DataContext-property. This shall point on the ViewModel we are creating for it. (Also described here)
The code-behind of a window stays empty. No matter what. There are cases to really do some work there but these are very rare!
Lets see some code:
Well if you only add a xaml-file or open a new wpf project in visual studio you can add a normal textblock to your xaml like this.
<Window x:Class="DataBindingGettingStarted.MainWindow"
        xmlns="http://schemas.microsoft.com/winfx/2006/xaml/presentation"
        xmlns:x="http://schemas.microsoft.com/winfx/2006/xaml"
        Title="MainWindow" Height="350" Width="525">
    <Grid>
        <TextBlock></TextBlock>
    </Grid>
</Window>
Now add a binding to it. Want we want to do is bind the Text-Property of the TextBlock to a value from the viewmodel. Lets prepare our XAML:
<Window x:Class="DataBindingGettingStarted.MainWindow"
        xmlns="http://schemas.microsoft.com/winfx/2006/xaml/presentation"
        xmlns:x="http://schemas.microsoft.com/winfx/2006/xaml"
        Title="MainWindow" Height="350" Width="525">
    <Grid>
        <TextBlock Text="{Binding NameToDisplay}"></TextBlock>
    </Grid>
</Window>
Now lets do the viewmodel. This is the base for our databinding. Its a normal class. Remember to name it like the view to associate it easier for other developers.
public class MainViewModel
{
    public string NameToDisplay { get; set; }

    public MainViewModel()
    {
        NameToDisplay = "Hello World";
    }
}
Remeber: This is an external class. It has “nothing” to do (yet) with the UI. There is no connection until here. In a project this could look like this:
The viewmodel offers all data it wants to show to the view (and perhaps some more ;) ). These data are offered with properties.
Note: You can make an interface for the viewmodel to see what exactly is on the view and what is not. To get a besser overview. But internally wpf will take the real implementaion of the viewmodel as datacontext. But for larger view/viewmodels adding an interface can makes sense. Also for testing/mocking etc.
You see that the MainWindow.xaml which we edited above and the viewmodel. We have no connection until here.
In the last part you have to let the view know about its datacontext. This property can be set to nearly every viewmodel but its the source for the view where to get their data from. So the “Text”-Property in XAML gets its value from…what? You can set the datacontext in XAML but I think its easier to set this in the codebehind. This is the only thing you should set there!
public partial class MainWindow : Window
{
    public MainWindow()
    {
        InitializeComponent();
        DataContext = new MainViewModel();
    }
}
And there you go. Now the view does know about the datacontext which is completely seperated. It is offering the information about properties and if you press F5 to run the solution you should see something like this:
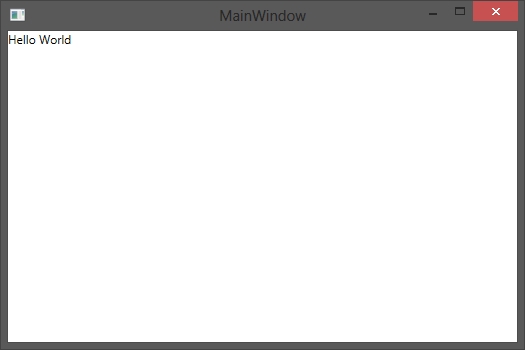
Now what we did is a normal Hello-World-Label. Depending on the UI-container (ItemControls, Comboboxes,…) you can bind whatever you want to the UI.
This is it for the first shot of databinding. But this is only the basic basic ;). But I wanted you to get the point.
Regards
Fabian
[UPDATE]
I decided to go on and show you how to bind a list of any objects you want. In my example these are hard coded. In your example they can (and should ;) ) come from a service/repository whatever.
First lets expand the viewmodel with a Person-class which has two properties: Name and Age.
public class MainViewModel
{
    public string NameToDisplay { get; set; }
    public List<Person> ListOfPersons { get; set; }

    public MainViewModel()
    {
        NameToDisplay = "Hello World";
        ListOfPersons = GetListOfPersons();
    }

    private List<Person> GetListOfPersons()
    {
        Person fabianPerson = GetPerson("Fabian", 29);
        Person evePerson = GetPerson("Eve", 100);
        return new List<Person> {fabianPerson, evePerson};
    }

    private Person GetPerson(string name, int age)
    {
        return new Person(name, age);
    }
}

public class Person
{
    public string Name { get; set; }
    public int Age { get; set; }

    public Person(string name, int age)
    {
        Name = name;
        Age = age;
    }
}
So right like the plain name we are offering a list of persons at the viewmodel.
Now that the viewmodel is our Datacontext it can access every property on it. So lets access this in XAML:
<Grid>
    <StackPanel>
        <TextBlock Text="{Binding NameToDisplay}"></TextBlock>
        <ItemsControl ItemsSource="{Binding ListOfPersons}">

        </ItemsControl>
    </StackPanel>
</Grid>
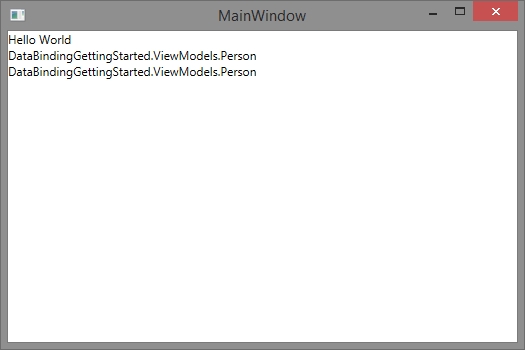
But if you run this you only see the namespace and the name of the classes. Why this? Because the only thing you give to the ItemsControl is the list of persons. From where should it know what to do with it? It calls the “ToString()”-Extension on “object” and gets the Namespace and the name of the class.
So lets tell the UI how to treat the objects. This can be done with an Itemtemplate.
<Window.Resources>
    <DataTemplate x:Key="MyItemTemplate">
        <StackPanel Orientation="Horizontal">
            <Label Content="{Binding Name}"></Label>
            <Label Content="{Binding Age}"></Label>
        </StackPanel>
    </DataTemplate>
</Window.Resources>
<Grid>
    <StackPanel>
        <TextBlock Text="{Binding NameToDisplay}"></TextBlock>
        <ItemsControl ItemsSource="{Binding ListOfPersons}" ItemTemplate="{StaticResource MyItemTemplate}">

        </ItemsControl>
    </StackPanel>
</Grid>
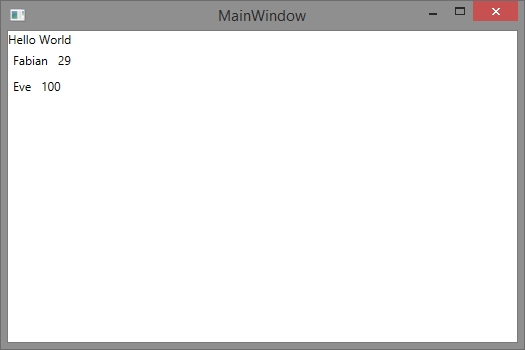
The Itemtemplate now tells the object how to appear. In my case these are two labels showing the two properties name and age.
I dont know why but this is a heavy thing every beginner stumbles upon: The Datacontext of you **view **is what we have set it to: The MainViewModel. Now you give the collection to the ItemsControl and make an ItemTemplate for each object in the list. So in the ItemTemplate the “datacontext” is the object “Person” itself and NOT the MainViewModel anymore! This is why you can access “Name” and “Age” in the DataTemplate directly. Because every Item (which the ItemTemplate is for) is a Person and a Person has got the mentioned properties.
Great. After telling this let this thing run and see the result:
Have fun
Fabian